 1")
Description
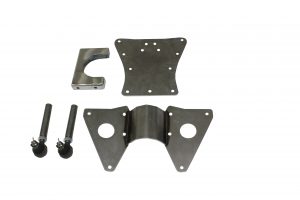
ES-2124 Transmission Mounting Kit for 1941-1948 Mercury (Turbo350,PowerGlide,Standard)
Bolt on unit allows removal of transmission without pulling engine. Wishbone splitting kits available for cars using solid axles. Fits all transmissions that measure 20 5/8″ from engine to center of transmission mount. Fits turbo 350, powerglide, and standard. Hardware and instructions included.
Installation Instructions for GM Turbo 350, Powerglide or Standard transmission for 1941-1948 Mercury car.
1. Remove original transmission mount from crossmember.
2. Clamp transmission plate in place using measurements given below:
Drill bolt holes in frame to 3/8″ and install the bolts. If wishoboen kit is used, drill those 2 holes to 9/16″.
3. The center X member need to be clearanced for most transmissions. Slide engine-transmission in place to determine areas of interference. Clearance can be done by heating and bending, or by cutting. We recommend bending to retain X strength.
Heat an area of about 2″ in dia. to red hot, and rap with a ballpean hammer. Metal will stretch easily when red hot.
CAUTION: Take appropriate fire prevention measures. Have water and/or a fire extinguisher on standby.
4. Use small modulator valve on Turbo350 for extra clearance.
Transmission Mounting Kit Using a Split Wishbone.
1. Before cutting or removing original wishbone, take accurate measurements from outer axle to a spot near the middle of the car. Record measurements, they are reference points.
2. Cut wishbone ball apart and insert threaded tube and tie rod end. Spread wishbone apart and install tie rod end in socket. Threaded tube should extend out of radius rod at 1″. Mark rod for later trimming. Check with reference points and mark both sides. Remove axle and wishbone as a unit.
3. Cut rod at mark and also in a 1/4″ wide strip, 3″ long and down the seam. Rod should now be worked with a hammer and anvil so that it fits the outside of the threaded rod.
4. Weld down the 3″ seam being sure weld penetrates to the interior threaded tube. Weld around the end.
Do not just weld around the end, take time and do it right. Because welding can distort, it is a good idea to re-tap the tube 3/4″ SAE-NF. Install tie rod end and lock nut.
5. Splitting the wishbone will also angle the front spring hangers. These must be straightened by heating and bending.
6. Reinstall axle and adjust using reference points. At least 1″ of threads should be in tube for safety.
![]() WARNING: This product can expose you to chemicals including nickel and urethane, which are known to the State of California to cause cancer and birth defects or other reproductive harm. For more information go to www.P65Warnings.ca.gov.
WARNING: This product can expose you to chemicals including nickel and urethane, which are known to the State of California to cause cancer and birth defects or other reproductive harm. For more information go to www.P65Warnings.ca.gov.


Reviews
There are no reviews yet.