
Description
CP-2204 Small Block Ford V8 Engine Mounting Kit for 1933-1934 Ford
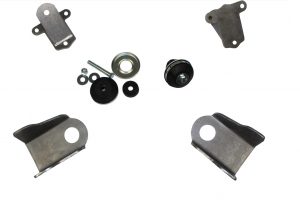
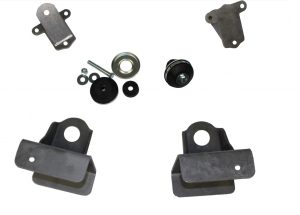
Engine Mounting Kit to fit small block Ford V8 into 1933-1934 Ford includes:
- Weld on frame adapters for boxed frame
- Chassis Engineering engine side mounts
- Thru bolt cushion set
Installation Instructions for CP-2204 Ford Small Block V8 Engine Swap Kit for 1933-1934 Ford Car and Pickup Truck
Note: CP-2204 is for 289-351 Windsor only. For Ford and Mercury Flathead use CP-2805, Information below includes instructions for X-member modification and transmission mount kit ES-2230 (* individual products, but often purchased together)
Engine Mounting Kit.
Note: always use proper safety equipment when welding and grinding.
1. Position and tack weld both frame adapters in place as shown below:
2. Double check measurements and weld adapters to frame. NOTE: sometimes the boxing plates are already installed inside the frame channel instead of outside.
The frame mounts are extra length to accommodate for this. In fact, if the boxing plates are correctly installed (on the outside), the frame mounts will need to be shortened to match. (Alternatively, making the engine mount holes slightly oval will account for the width variation as well).
ES-2230 X-member modification and Transmission Mounting Kit (not included in CP-2204 Engine Swap Kit)
1. Remove original saddle from center of X-member. Be careful as some rivet holes are being reused.
2. Bottom lip on frame X member will need to be straightened back to 90 degrees. Flatten dimples around old rivet holes.
3. Slide bottom plate and uprights into X member from rear. Line up the front holes (on bottom plate) with original rivet holes. Clamp into place and ream-drill all holes to 11/32″. Install bolts. Drill the side brace holes to 11/32″ and bolt to X.
4. Place wings on top of frame and line up 4 rivet holes. Drill all 6 holes to 11/32″. Put wings under frame lips and bolt into place to the X.
5. C4 transmissions will use the holes punchmarked. Different transmissions will require cutom fitting. Holes are not drilled to allow for engine variations. The punch marks are where Chassis Engineering kits locate the transmission.
6. The X member lip may need to be bent down for clearance on the left side. If so, use heat and a 12″ cresent wrench to shape. Do not cut X-member for clearance as this will weaken it. Install transmission to find interference spots.
7. The rubber mount will be difficult to install. Lay mount in lower plate before installing transmission. Mount can then be bolted to the engine and then to the lower plate.
![]() WARNING: This product can expose you to chemicals including nickel and urethane, which are known to the State of California to cause cancer and birth defects or other reproductive harm. For more information go to www.P65Warnings.ca.gov.
WARNING: This product can expose you to chemicals including nickel and urethane, which are known to the State of California to cause cancer and birth defects or other reproductive harm. For more information go to www.P65Warnings.ca.gov.


Reviews
There are no reviews yet.