
Description
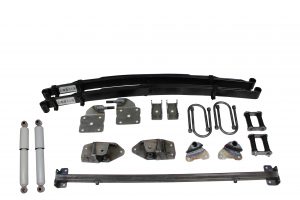
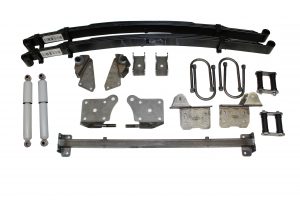
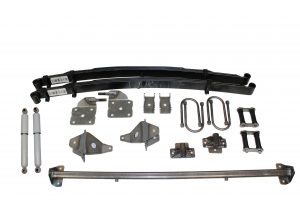
AS-1019 Rear End Mounting Kit for 1941-1948 Chevy
Bolt on kit for the 1941-1948 Chevy car. Not for use with stock springs.
This Kit Includes:
Front and rear spring mounts
Hardware
General spring info
Instructions
Installation Instructions for AS-1019 Bolt on parallel leaf spring mounts for 1941-1948 Chevy (Car only)
Please read these instructions carefully before you start putting things together.
1. Remove original spring hangers by drilling out the rivets. Be careful because the holes are being reused.
2. Spring mount (front): Line up the holes in the mount with the rivet holes (same ones of the original mount). The offset goes to the rear and outside. Clamp it in place and ream-drill for 5/16″ holes. Then bolt the mount in place.
(Do not install the front brackets backwards, because the center line rear axle will end up approx 3″ to far backwards)
3. Spring mount (rear): Left and right mounts are the same. The offset goes to the outside. The two front holes in the new mount match the two front holes from the original mount. Clamp the mount in place and ream-drill the 2 front holes and the 2 rear ones through the bracket to 5/16″ and bolt the part in place.
4. Bolt springs in place (2 clamps to the front). Front uses stock bushing. Rear is empty to accept the furnished shackle. Install the shackles.
Shackles: When tightening the shackle nuts, the outside shackle plate seats on the shoulder of the shackle studs and not when the bushings smash.
Rear Shock Kit
1. Clamp upper combination shock mount / swaybar mount to the frame in the location shown. On some cars there might be a bit of interference with the spare-tire well. Modify the well as needed. The tube goes below the frame rails, not in between. Drill frame to 5/16″ and bolt upper mount in place.
Install shock studs (from shock hardware bag) pointing forward.
2. The spring retainer is used with the shock mount angled down. Spring retainer is installed with stud towards the inside and pointed backward.
Finally
1. Rear end pads. Weld pads (spring and swaybar) on the rear end in these locations. We suggest a tack weld until you can check pinion angle with complete weight on the car.
2. Pinion will normally point up at 4 degrees. Swaybar pads should be straight (parallel) with spring pads, pointing forward.
3. Slip U-bolts over axle and bolt unit together and install shocks.
Springs:
New springs will normally drop up to an inch in the first 500 miles of use. Depending on the weight of the car, new springs can have a slight arch, sit flat or be slightly reverse-arched. This is normal.
The spring is acting like it should. Also, parallel leaf springs are almost never perfectly parallel, it is just a name for this type of suspension.
We do not recommend hard bushings of any kind for springs. Rubber bushings will absorb vibrations and road noise and allow for some flexing.
![]() WARNING: This product can expose you to chemicals including nickel and urethane, which are known to the State of California to cause cancer and birth defects or other reproductive harm. For more information go to www.P65Warnings.ca.gov.
WARNING: This product can expose you to chemicals including nickel and urethane, which are known to the State of California to cause cancer and birth defects or other reproductive harm. For more information go to www.P65Warnings.ca.gov.


Reviews
There are no reviews yet.